Zoom is a video conferencing tool that allows users to communicate live or synchronously virtually. Zoom is available to all University of Portsmouth staff and students, it can be added as an activity tool for communication in Moodle.
It consists of a variety of features beneficial for learning and teaching. Here are a few:
- video and audio conferencing,
- screen-sharing
- live chats
- breakout rooms for small group activities
- polling
- whiteboard annotation
- reactions and hand raising
There are dedicated Zoom spaces available in the university, click here to book a Zoom room. These rooms are equipped with the facilities necessary for video conferencing.
Here are a few things to consider in ensuring that you have a successful session while using Zoom
- Ensure your Zoom application is updated and you are using the latest version of the software.
- Ensure you close all running sessions of Zoom when you are done
Frequently Asked Questions
If you already have a Zoom account
If you already have a free or Pro zoom account using your University email address you will be asked if you would like to join or keep your account separate when you first log in. We recommend that you join your account so you no longer need to pay for an additional license. If you have any stored recordings you will need to download these before you join your account, you can re-upload these after you have joined your accounts.
If you choose not to join accounts, you will be prompted to change the email address on your account so it no longer uses a University email address. We advise you to join accounts so individual licenses are no longer required.
To convert your free or Pro account to a University of Portsmouth account that is fully licensed you must log into the University of Portsmouth domain using Single Sign-on (SSO) using the link below, choose Sign-in then log in with your University username e.g. bloggjs and password.
Set your account up
To set your account up, visit the link below and choose Sign-in then log in with your University username and password.
If you are struggling to get this resolved please contact IS ServiceDesk
Once you have gotten yourself a Zoom account, the next step will be to check if there is an existing Zoom instance on your module and if there isn’t one available to allow you schedule meetings please follow these steps to add a Zoom instance to your module
When you are ready to add a Zoom instance to your module, Turn editing on, and navigate to the first section. ![]()
Scroll-down on the section and click “Add an activity and resource“, and select “Zoom” from the list of options.
![]()
In the next window, give the activity a name and the expected study time. Click “Save and return to course”.
The next step covers how you can schedule a meeting in zoom, please follow on.
Click here to watch this brief video
It covers the following
- How to add Zoom to your modules
- Schedule a Zoom meeting
Now that there is an existing Zoom instance in your module, you can schedule multiple meetings using it. To schedule a meeting please follow these steps.
Step 1: Start by clicking on the Zoom icon in the first section in your module page.

Step 2: Click on “schedule a new meeting” blue button located at the top right corner.
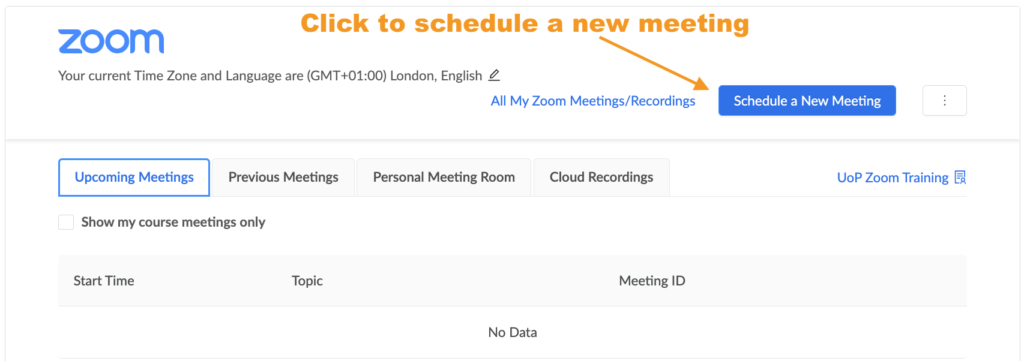
Step 3: Fill out the following required questions, starting with the following:
- Topic
- Description
- Date, time and duration.
- Only click the checkbox for “Recurring meeting” and select the appropriate parameters if you this option is suitable.
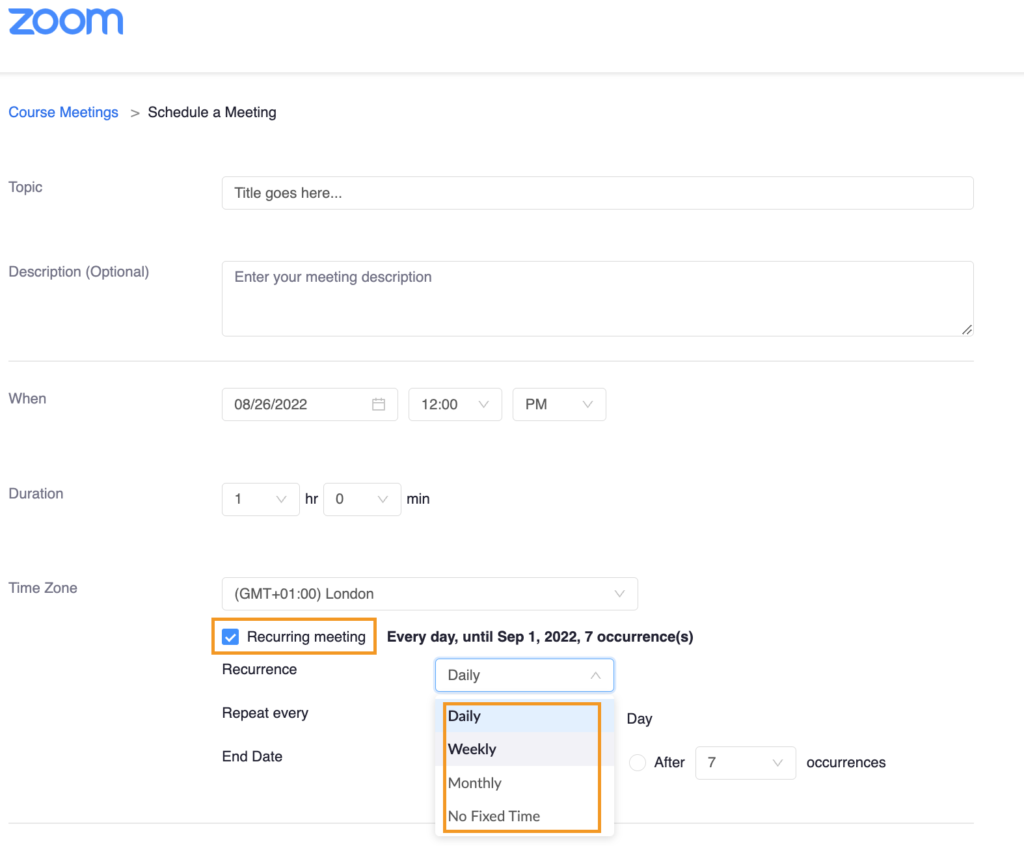
- Time zone: leave as default.
- Registration: leave as default.
- Security: leave as default.
- Video: leave as default or modify based on you preferences
- Audio: leave as default.
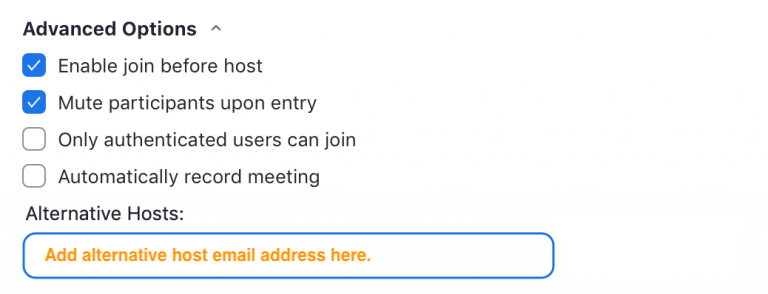
- Meeting option: Select options based on your preferences
- Alternative host: Add alternative host by adding their email addresses followed by a comma after every one added.
Click “Save” to confirm action
Step 4: Once created, the session information is displayed. You can then close this tab and return to your module where you will be able to find the Zoom meeting link.
Recurring Zoom meeting feature allows users to schedule meetings with multiple occurrences, so that each occurrence uses the same settings. You can schedule these meetings in daily, weekly, and monthly increments. You can also set a recurring meeting to be used at any time.
Benefits
- Makes it easy for your students to use or visit one dedicated Zoom link for current and subsequent meeting sessions
- All settings remain the same for all meetings, for example it saves how you set up breakout rooms and also your gallery view of the participants so that it will be the same when next you meet.
How to schedule a recurring meeting in Zoom
When scheduling a meeting in Zoom, please select the recurring meeting option, where you can select the repeated meeting occurrence of your choice on a daily, weekly and monthly bases.

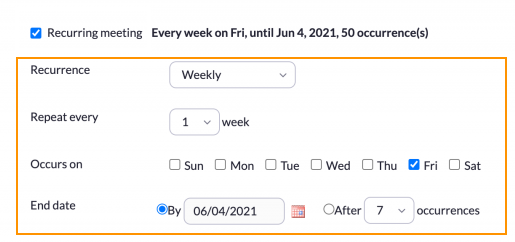
For example, If the weekly option is selected, the user will have to select a day in the week when the meeting should run by doing the following:
- Repeat every: Users can state whether the meeting should be run every 1,2, or more weeks
- Occurs on: The day of the week when the meetings should occur, multiple days could be selected.
- End date by and after: This allows users to decide when the meetings should end.
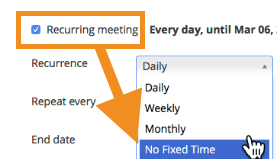
Alternatively, users can select “No Fixed Time” to leave the meeting open. Doing this way will allow the host to place a description under the Zoom link in Moodle. The description should state the the recurring time daily, weekly, or monthly.
 |
 |
Note: Recurring meetings with “No Fixed Time: will be available up to a year from the last date it was used. After that the link will expire.
To share your screen while in a Zoom meeting
- Join or start a Zoom meeting.
- In your meeting, you’ll see a selection of meeting controls, including the ability to mute your voice, start and stop video, and more. Select the green Share Screen icon. …
- Choose the screen you want to share. …
- Click share.
Watch the video below for more information.
To record your Zoom session please follow the steps below.
- Start a Zoom meeting as the host.
- Click Record .
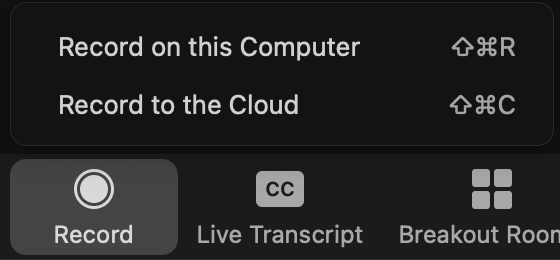
- If there is a menu, select Record on this Computer. …
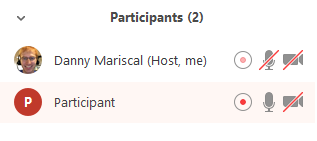
- Click Participants to see which participants are currently recording. …
- After the meeting has ended, Zoom will convert the recording so you can access the files.
We recommend that all users click “record to the cloud ” and this will placed recording in Panopto folder for later use. To locate and make it available to you students please follow the steps below.
Locate Zoom recordings
Step 1: Go to your Panopto page, click on “My folder” link at the left of the page
![]()
Step 2: Next, click on “Meeting Recordings” to view your Zoom recordings
![]()
Alternatively, if you had selected “Record on this Computer ” when when recording your Zoom session. By default, local recordings will be placed in following directory in your computers Operating System.
- Windows: C:\Users\[Username]\Documents\Zoom
- Mac: /Users/[Username]/Documents/Zoom
- Linux: home/[Username]/Documents/Zoom
Make Zoom recordings available to Students
Before adding or sharing the recorded Zoom videos on your module, please make sure it is moved away from your personal Panopto folder called “My folder” as the content of that folder is only visible to the owner.
To move the Zoom recorded video please follow the steps in this link.
After this is done, you can add the recorded video to your module using the Panopto activity.
Alternative Hosts provides authorized individuals the ability to start a meeting on the host’s behalf. If an alternative host starts a meeting, they will receive the same privileges as the original host. If the host already started the meeting, the alternative host will join as a co-host automatically.
Alternative host can be added via email addresses when scheduling new meeting in Zoom.
A Zoom co-host is a role that can be applied to any participant in a meeting or webinar at any time. There is no limit to the number of co-hosts you can have in a meeting.
A co-host can perform tasks like:
- Start and stop recordings
- Manage in-meeting security features
- Admit participants from the waiting room
- Manage participants, including muting microphones or lowering hands
- Share their screen, even when participants are not allowed to do so
- Start and manage breakout rooms if both the host and co-host are using Zoom
Co-hosts cannot, however, start a meeting on behalf of the host.
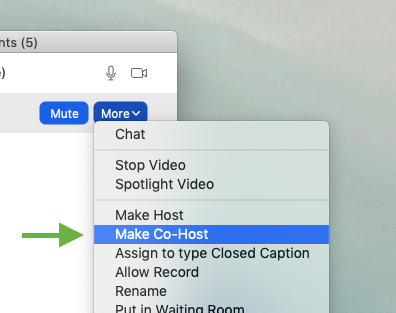
Hosts can designate or remove co-hosts at any time in a meeting. To make someone a co-host:
- Click the “Participants” button in your meeting control bar.
- Hover over the name of the desired co-host.
- Click the “More” button.
- Select “Make Co-host” from the menu that appears.
If a meeting is scheduled in Zoom via Moodle, students do not receive notification of any kind from Zoom. Please send a class announcement telling students about the scheduled session and specifying the Zoom activity name in Moodle, time and any other requirements needed.
Breakout rooms are sessions that are split off from the main Zoom meeting. They allow the participants to meet in smaller groups, and are completely isolated in terms of audio and video from the main session. Breakout rooms can be used for collaboration and discussion of the meeting.
How to create pre-populated breakout rooms?
To create pre-populated breakout rooms ready for your session, please follow the steps in the link
How to create Breakout Rooms
- Start an instant or scheduled meeting.
- Click Breakout Rooms .
- Select the number of rooms you would like to create, and how you would like to assign your participants to those rooms: Assign automatically: Let Zoom split your participants up evenly into each of the rooms. …
- Click Create.
For a more details information on this please see the video below.
The polling feature for meetings allows you to create single choice or multiple choice polling questions for your meetings. You will be able to launch the poll during your meeting and gather the responses from your participants. You also have the ability to download a report of polling after the meeting. Polls can also be conducted anonymously, if you do not wish to collect participant information with the poll results.
Click here for more information