Prior to the pandemic, you may have used Camtasia to record your teaching sessions on campus. Camtasia has now been replaced by Panopto.
If you need to record any of your physical teaching sessions, our recommendation is to use your university laptop, and to record using Panopto. If you haven't done so already, you can download the Panopto app from AppsAnywhere, or use the web version.
Why are we recommending using a laptop?
- It's more familiar: most people now have laptops, which means your setup stays the same each time you teach (instead of having to log into different computers in each room).
- It's quicker (and less stressful!): you may recall that logging into teaching room computers takes a VERY long time. Using your laptop will save you valuable time at the beginning and end of each teaching session.
- It's more reliable: saving your recordings on your university laptop means you are less likely to lose them (anyone who used Camtasia regularly in the past may have experienced this!).
What do I need to do?
- To display the screen of your laptop on the teaching room screen, you just need to plug in an HDMI or VGA cable and switch the system to the appropriate input.
- To record your voice, IS and DCQE have purchased a large batch of wireless USB lapel microphones (powered by AA batteries), and they are available on long-term loan from IS (please complete this IS form to arrange a collection date and time from St. Andrew's Court. You will need to select "yes" when asked "Do you know what specific peripheral(s) are required?" then select the "USB Lapel/Lavalier Microphone (Lecturing, Academics Only)).
- The BaL Digital team is happy to show staff how to use a wireless microphone if required, and to can help to ensure your laptop setup is “ready to record” for live sessions. This will have to be done ahead of time and not on the day of recording.
What if I don't have a laptop or can't take one to the teaching rooms with me?
We encourage anyone who can use a laptop to do so, as it will make this process much easier. However, we appreciate this may not always be possible. If you are unable to use a university laptop or have any additional questions, please get in touch with BaL Digital and we will work to help you find a solution.
A quick start guide for recording with your laptop and a wireless microphone:
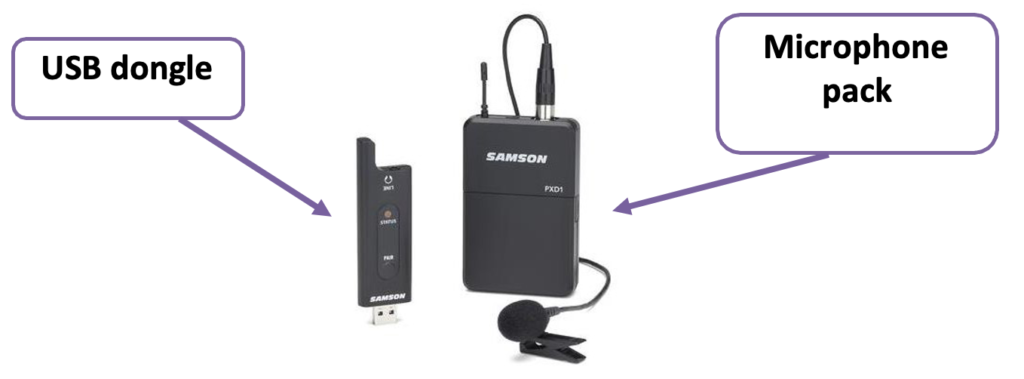
Your laptop setup and wireless microphone may vary slightly, but in principle, your wireless microphone will have a dongle that connects to the computer via USB, along with a microphone pack:
To begin recording:
- Switch on your
- Download Panopto if you don’t already have it (available from AppsAnywhere, or use the web version).
- Plug in the USB (dongle) part of the microphone
- Make sure the other end (the microphone pack) is switched on (and contains batteries!).
- Open Panopto and sign in using your university Once you’re logged in, you should see a screen like this:
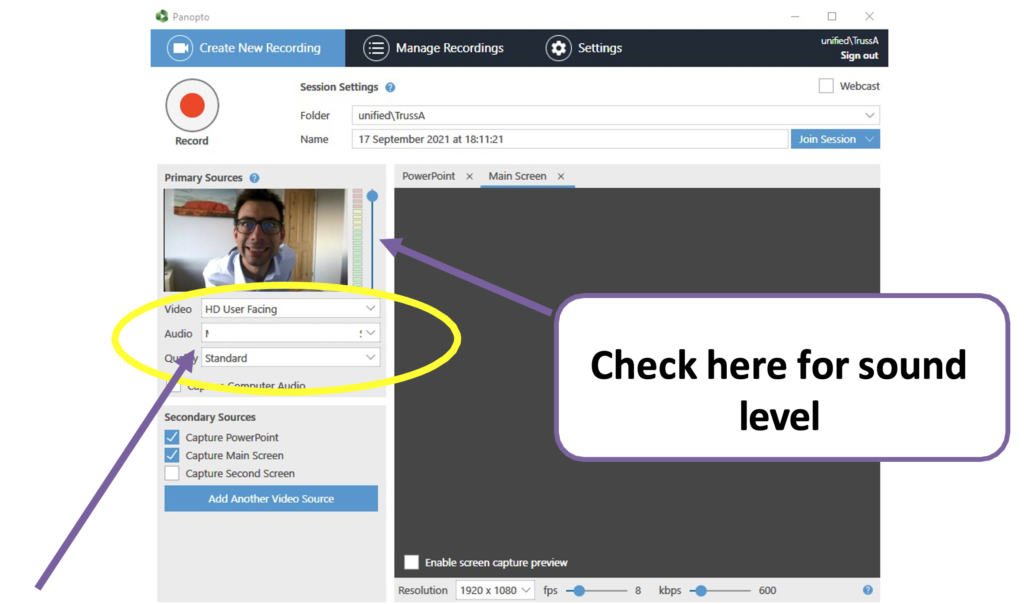
- Make sure the audio input is switched to USB Make sure you are getting a sound level when you talk (if you can’t see the coloured level, the sound isn’t working).
- Make sure your slides are displaying (if required) and press record
We recommend doing a test recording at home, before coming to campus to teach for the first time. More guidance on using Panopto can be found on this DCQE website, or for further assistance, contact BAL Digital.