With Moodle assignment submission dropbox students can submit any digital content (files), such as word-processed documents, spreadsheets, images, or audio and video clips. It also allows students to submit single or multiple files if specified as well as group work, and receive different grades and feedback for the group work.
The guide below shows how you can create Moodle assignment submission dropboxes, it also allows users to enable the Turnitin similarity report feature to check students' work. Unlike Turnitin submission dropbox which releases grades automatically on a set date, users can allow students to make on-time, ECF, and late submissions to the same dropbox because grades and feedback can be manually released whenever they are done marking leaving the ECF and late to be released at a different time.
Moodle submission dropbox
Step 1: To create a Moodle dropbox for your module, first ensure that the ‘Editing’ is turned on. The ‘Editing’ slide bar is located in the top right corner of your module site, underneath your name
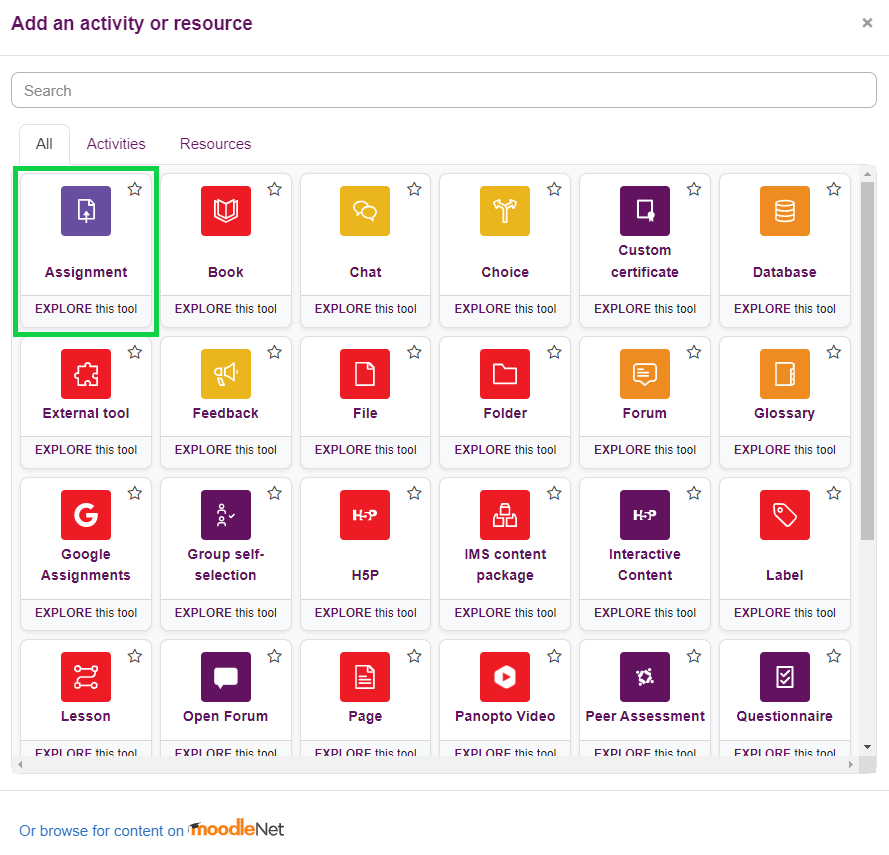
Step 2: Then, go to the ‘Assessment and Support Materials’ topic/section to add the assignment dropbox, and then click on the ‘purple icon’ next to the topic name to display the ‘Add an activity or resource' button.

Click the Assignment icon from the list to add. You can find more information about Moodle assignments by clicking "Explore this tool".
Step 3: You will now see the 'Adding a new Assignment' page, you will be required to give your assignment a name, assessment type, and weighting here.
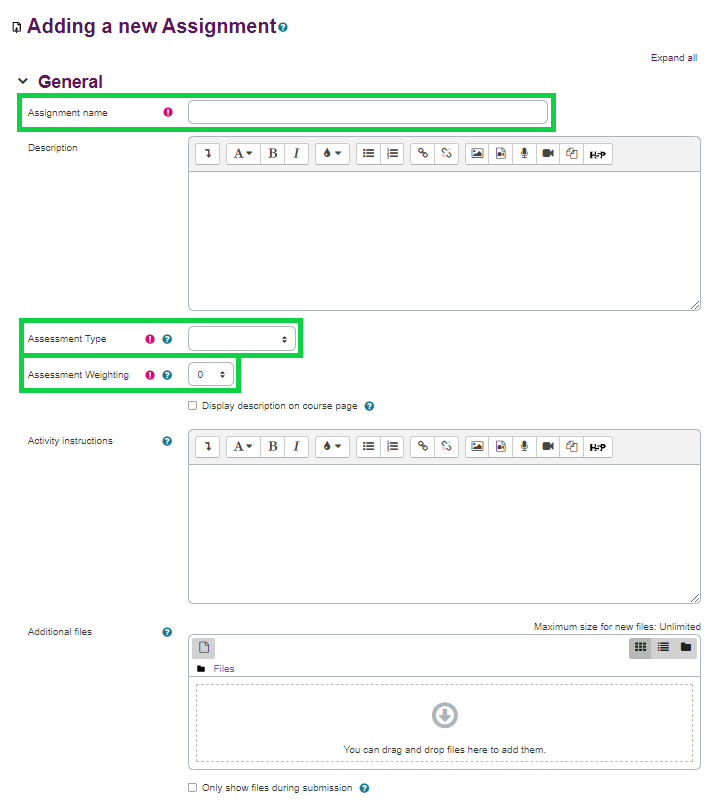
Enter a 'Moodle Assignment title’ and use the pro forma assignment summary/description below
Note:
- Please provide an appropriate assignment title that your students will understand and not use "Assignment 1, 2,3..."
- Enter "Submission Dropbox" as a suffix of the title
You are also expected to add a summary/description to give guidance to learners.
Please use this Moodle Assignment pro forma summary/description
Instructions for submission:
|
Step 3.1: In the General settings you will also find the following options to select from:
Assessment type: This is where you select whether it is a formative or summative piece of work.
Assessment weighting: Please enter the weighting in relation to all the summative assessments in the module (out of a maximum of 100%)
![]() Please use the BAL dedicated proforma Turnitin assignment summary/description above(this only displays if you choose to do so by clicking on "Display description on course page").
Please use the BAL dedicated proforma Turnitin assignment summary/description above(this only displays if you choose to do so by clicking on "Display description on course page").
You should provide instructions for students in the 'Activity instructions' and have the option to add relevant files below this.
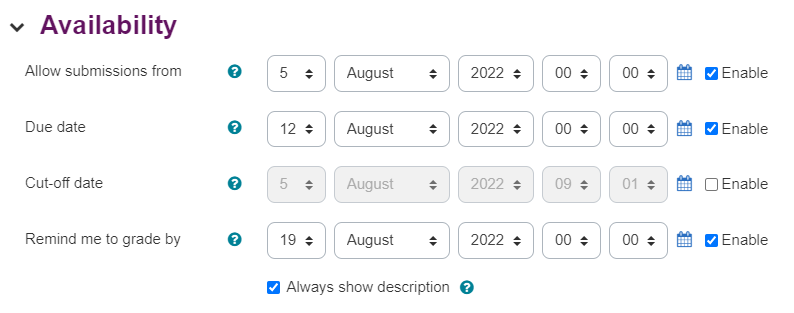
Next, there is a range of settings you can alter, starting with the Availability section explained below:
-
Allow submissions from – this allows you to set the start date for the assignment when the students are able to submit work.
-
Due Date – this allows you to set when the Assignment is due for hand-in. (We recommended time should be set as 23:55hrs)
-
Cut-off date – this is the cut-off for hand-ins. It allows for students to hand in after the due date but highlights to the marker if there was a late submission. The assignment will not accept submissions or allow edits after this time.
Always show description – if disabled, the Assignment description in the General settings will only be visible to the students on the “allow submission from” date.
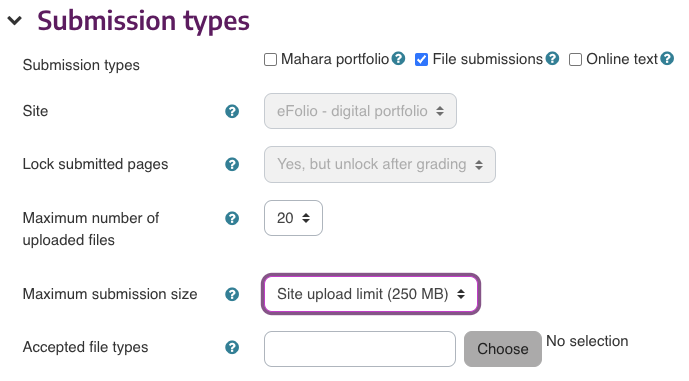
Step 5 - Submission types settings
The Submission types section has a range of options below. For most assignments, the default settings will be best.
-
Submission Types – you may choose between allowing students to submit files (default) or typing directly into a text box on Moodle (with word limit).
-
Maximum number of uploaded files – allows you to set the maximum number of files a student can upload for their submission.
-
Maximum submission size – change the maximum size of the file students can submit.
- Accepted file types: Here you indicate if you are willing to accept file types other than Microsoft Word, PowerPoint, or Excel Spreadsheet. To do this, click "Choose" to expand and select the file types you are prepared to receive.

The Feedback types section has a range of options to set how you would like to give feedback to students:
-
-
Feedback comments - allows you to add comments to each submission.
-
Annotate PDF - creates a PDF of the students work, allowing comments, drawings and stamps to be placed directly on top of a students work. This is browser-based, so no extra software is needed.
-
Offline grading worksheet - allows for a CSV (comma separated value) file to be downloaded. It should open within Excel and allow the academic to edit the grades and add feedback comments. These can then be uploaded back into Moodle, where it will automatically populate the correct students' grading area.
-
Feedback files - allows you to upload a file with feedback in and attach to each submission.
-
Comment inline – if enabled, the submission text will be copied into the feedback comment field during grading, making it easier to comment inline (using a different colour, perhaps) or to edit the original text.

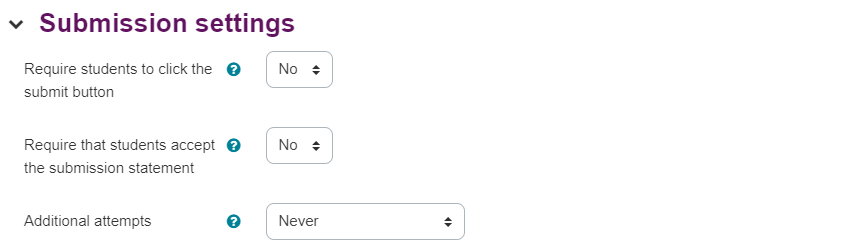
Under the Submission settings section, you can choose how you want the students to submit the work. Different combinations of these settings allow for different types of assignments:
-
Require students to click the submit button – if enabled, students will have to click a submit button to declare their work as final. This allows students to keep a draft version of the submission on the system. If the setting is changed from No to Yes after hand-ins have been made, those submissions will be regarded as final.
-
Require that students accept the submission statement – students must agree to a predefined statement stating the work is their own and does not contain any plagiarism.
-
Additional attempts – determines how student submission attempts are managed. The available options are:
-
Never – Only one attempt is permitted.
-
Manually – A lecturer can manually set specific students to be given a further attempt at submission.
-
Automatically until pass – Students are automatically given further attempts at submissions until they achieve the Grade to pass value set in the Grade section for this assignment.
-
The Group submission section has a range of options to select:
-
Students submit in groups – when enabled, students will be divided into groups based on the default set of groups or a custom grouping. A group submission will be shared among group members and all members of the group will see each others' changes to the submission.
-
Require all group members submit – if this is enabled, all the members of the group must click the submit button for the submission to be considered. If disabled, the group submission will be considered as submitted as soon as any member of the student group clicks the submit button.
-
Grouping for student groups – this is the grouping that the assignment will use to find groups for the student groups. If this is not set, the default groups will be used.
Notifications settings
-
Notify graders about submissions – if this setting is enabled, the grader (usually the lecturer) will receive a message whenever a student submits an assignment. The message methods are configurable.
-
Notify graders about late submission – if this is enabled, it will email the graders (lecturers) when work is submitted after the due date.
Grade settings
The Grade area allows you to choose the maximum grade available for an assignment. In addition:
-
The Grading Method allows you to choose a standard grading option: Simple direct grading, a Rubric or a Marking Guide. By selecting the Rubric or Marking Guide and then saving the Assignment, an option to create the rubric or marking guide will appear. (These will be produced as separate guides.)
-
Additional settings can be altered to set a pass grade, allow anonymous submissions from students or hide the identity of the grader.
Common module settings
-
The Common module settings relate to the groups and grouping selection for the Assignment.
-
Please see the separate online guide on Groups and Groupings for a more detailed explanation.
Restrict access settings
The Restrict access section allows for the overall resource to be hidden or released to a student defined by either a date or grade condition. Click Add restriction to display 5 options:
-
Activity Completion- require students to complete (or not complete) another activity
-
Date – prevent access until/or after a specified date / time
-
Grade – require students to achieve a specific grade on another activity before proceeding
-
User profile – this section allows you to define access by a user ID, name or a range of other fields that are available for a user to complete
-
Restriction set – this allows you to add a set of nested restrictions to apply complex logic
For example, you can choose to release the assignment to students on a certain date, but to only those who have achieved a certain grade on a previous assignment.
Additionally, toggling the eye icon to the left-hand side of each restriction allows you to choose to have the resource:
-
Greyed out when the student can’t access it, so that they can see it but not attempt it.
-
Completely hidden, until the student has met your set criteria.
Step 13: Confirm chnages
When you are finished, click on "Save and return to course" button.
![]()